IntroductionI'm new to flying RC helicopters. I found an electric RC heli called the Dragonfly at a great price and I ordered one. It's fun to fly, but I had trouble finding the information on it that I wanted on the Internet, no Dragonfly FAQ could be found, so I've started this page as an aid to other Dragonfly beginners. This is not meant to replace the manual or the assistance of an expert. If your transmitter doesn't look like the one pictured above, take what's written here with a grain of salt, and keep in mind that I probably can't help you with questions. Check out the discussion boards and other links listed at the bottom of the page for assistance. Unfortunately, my life is rather busy at the moment, so please
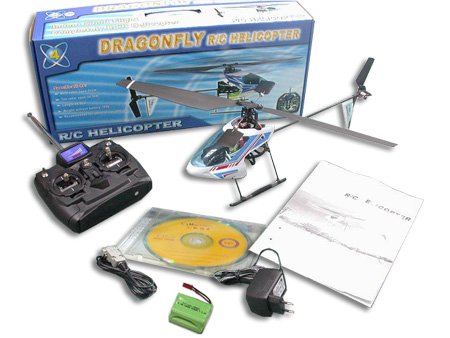
don't be offended if I don't reply to your email. OrderingI got my Dragonfly (Mini Helicopter Dragonfly #4 Version 2) from RC-Expert.com for about $100. It comes ready to fly right out of the box, except for 8 AA batteries (for the transmitter) and a rubber band. All you have to do is straighten the rotor blades, install the batteries and do a little balancing. It also helps to practice on the simulator first to reduce crashing and improve safety. In addition to the basic Dragonfly, which comes with the heli, battery, transmitter, simulator cable and simulator software, I suggest the addition of the training kit to help reduce crashes. Speaking of which, the heli is so cheap compared to other helis and other vendors that I recommend the purchase of a second heli right off the bat, to be used as spare parts. This will reduce down-time after a crash so you don't have to wait for replacement parts. The Dragonfly comes set up for Mode 1 operation by default. In Mode 1 operation, the left joystick controls the pitch and yaw, the right joystick controls thrust and roll. This setup is more common in Europe and Asia. In Mode 2 operation, the left joystick controls thrust and yaw, and the right joystick controls pitch and roll. This is the common configuration in the United States, and this is the recommended method so that other flyers can operate your helicopter without difficulty. Request Mode 2 when you order your heli. Note: The Dragonfly comes with a 8.4 NiMH battery and charger. RC-Experts offers other battery options for the Dragonfly; a 7.4v Li-ion battery set, or an 11.1v Li-ion battery in either 800mAh or 1100mAh. The 11.1v batteries provide more power, but they are not recommended for beginners. The 7.4v battery provides about the same power as the stock 8.4v, but lasts twice as long, about 20 min. compared to the stock 10 min. Setup
About the TransmitterThe transmitter has two silver toggle switches on its face at the top corners. They have no function. Next to the right toggle is a black pushbutton, which also has no function. On the back is a set of 8 small DIP switches. The first four determine the polarity of the servos, the other four are unused. There is a jack that looks like it might be for an external antenna, but its use is unknown. There is a jack for an AC adapter, but its use is not recommended. I have an email from another Dragonfly owner who has measured the voltage at the jack, he writes that it's 12v, positive tip, drawing about 430mA, but the batteries are NOT disconnected from the circuit when the jack is employed, preventing use of an AC adapter while regular batteries are installed. This jack is probably meant to be used with rechargable batteries. The "bar graph" on the transmitter seems to indicate battery power. As the batteries lose charge, the bars decrease from right to left. There is a silver eyelet between the joysticks so you can attach the transmitter to a neckstrap, recommended to keep from dropping the radio. The DIP switches should all be set to Off (left) except for 1, 3 and 4. (Note that this corresponds to the Inverted setting in the Control setup in the simulator. The switch settings are the same for both Mode 1 and Mode 2.)

About the SimulatorMy Dragonfly came with an old version of Tru-Flite 3D on CD, but it didn't work with the simulator cable supplied. Ask your vendor for a link to their simulator software and use that, or install the free FMS simulator and the PPJoy joystick emulator that lets you use the Dragonfly transmitter and simulator cable to fly the heli in FMS. If the file from your vendor installed a Dragonfly.par file in FMS, use that, otherwise use the Threedee.par file that comes with FMS. In the simulator, you need to select Controls, then Analog control, choose the Joystick interface and click on Mapping / Calibration. For both Mode 1 and Mode 2 operation, the eight values down the left should be 4, 2, 3, 1, 4, 2, 3, 1. The Tail, Roll and Pitch should have a checkmark in the Inverted column. Then you can click Calibrate and calibrate the range and the centers of the joysticks. About the Simulator CableSomeone sent me the following wiring diagram for a cable. I haven't tried it, and can't vouch for it, but you're free to try crafting one. One end is a DB9, the other is an S-Video connector.
RC-Expert sells the cable for about $10.
About PPJoyPPJoy is a joystick emulator for Windows. It was originally designed to use the parallel port as the joystick interface, and can now use other ports to emulate the parallel port. To use PPJoy with the Dragonfly, run the "Configure Joysticks" wizard and add a new controller. Set the Parallel port to "Virtual port" and let Windows add the drivers. Then run PPJoyCOM and set the Joystick device to the Virtual joystick. Select the Serial port your transmitter is connected to, and set the Serial protocol to Zhen Hua 5 byte protocol. When you turn on the transmitter, PPJoyCOM should say "Reading serial stream" and PPJoyCOM should be left running until you close the simulator. PPJoyCOM is what's making the transmitter, connected to your serial port, look like joysticks to FMS. Pre-FlightThe helicopter has no power switch. To turn it on, you plug in the battery; to turn it off you unplug it. Before turning on the helicopter you should set the throttle to the lowest setting and then turn on the transmitter. Unlike many other RC models, you can power up the heli before the transmitter and it will leave the rotors off until it gets a signal from the transmitter. However, it's better to build up safe habits by setting the throttle and turning on the transmitter first. You can power down in any sequence, but again it's safer to power off the heli first. When you first set up the heli, you want to do it on a smooth surface that it can skid on, like a wooden or linoleum floor. You give it just enough power to get light on its skids, and then set the trim on the joysticks to keep it from going forward or back. It's okay if it goes to the left a little. Make sure the blades are aligned properly. The tension should be tight enough that the blades don't move easily, but loose enough that they can straighten themselves under power, and if they hit something they will rotate. Stand at least six feet away. I fly my heli in the back yard. You want someplace with lots of room to give you time to make corrections, and a place to run if it comes too close. You don't want to launch from grass, because the tail can sink into the ground. I took a cheap oil drip pan from the garage and put it upside-down on the grass. That gave a smooth surface to launch from, and if the heli crashes it will land in the soft grass or on the pan, which has some give to it and isn't rough like concrete or asphalt. Flying the HelicopterI'm just a beginner myself, so you should consult other web pages, and preferably an experienced flyer in your area who can help you. My recommendation is to practice on the simulator first. Learn to control the heli flying tail-in first (with the tail towards you). Then practice head-in, and then side-in. A flying helicopter has sharp blades rotating at high speed, you want to be able to control it when you fly the real thing. You'll be glad you practiced on the simulator when your heli comes at you with its whirling blades of death and you're able to send it away. Stand at a safe distance when flying, at least six feet away. Flying is not like driving. There is no road to anchor the heli in position. Once you start it in a given direction, it will keep going in that direction until you tilt it in the other direction. It's like rolling a ball, you send it off one way and then you push it the other way to slow or stop it. It will be a constant series of corrections to keep it hovering in place. Learning to hover is your first goal. Once you can keep it hovering in place, from all perspectives (not just tail-in), then you can learn forward flight. After practicing on the simulator, when I began flying the Dragonfly I started by giving the heli just enough power to be light on its skids, and learning to keep it in place. I also learned that if you give it just a little more power, it will want to either skitter to the left, or tip over to the right. It doesn't fly well at ground level, so when you're ready to fly it, you need to give it enough thrust to get it more than a foot in the air. If anything goes wrong, bring it down. Practice in short hops, going up and coming down until you can control it better. After flying, adjust the trim to keep it from going in any direction when the sticks are centered. The better trimmed it is, the easier it will be to fly. Fly at your own risk. When I first started flying the heli was like a marble in a bowl. It would go down to the left and I'd correct it, and it would go up to the left in a big curve, like it was rolling up a bowl. When it hit the top of the curve, it would come down in the other direction like a marble rolling back down the bowl. I learned to correct the motion so that the top of the curve would come faster, and to level out when it hit the top of the curve so it wouldn't come rolling back down. Little corrections done quickly work better than big corrections done slowly. VibrationA common problem with RC helicopters is vibration. Excessive vibration makes hovering more difficult, uses up power, causes "gyro drift" and increases wear and tear. Several things can cause vibration, which makes it difficult to identify its source. Further information on this topic can be found in the Electric Helicopter Beginner's Guide. Below are some of the possible causes:
I've also noticed that if the rubber retaining sleeves for the balls on the training gear aren't holding the balls in place, then the balls can slide back and forth and cause a slow wobble. (Discovered that today. I was able to hover after that for almost 30 seconds before I got skittish and brought it down.) Links
ContactIf you have suggestions for this web page, or you want to send money to help support it, please contact me at dgoodman@infoway.com and put "Dragonfly" in the subject. I hope this page has been of use to you. Dave GoodmanCalifornia Photos courtesy of RC-Expert.com Text Copyright © 2004 by David K Goodman |
|